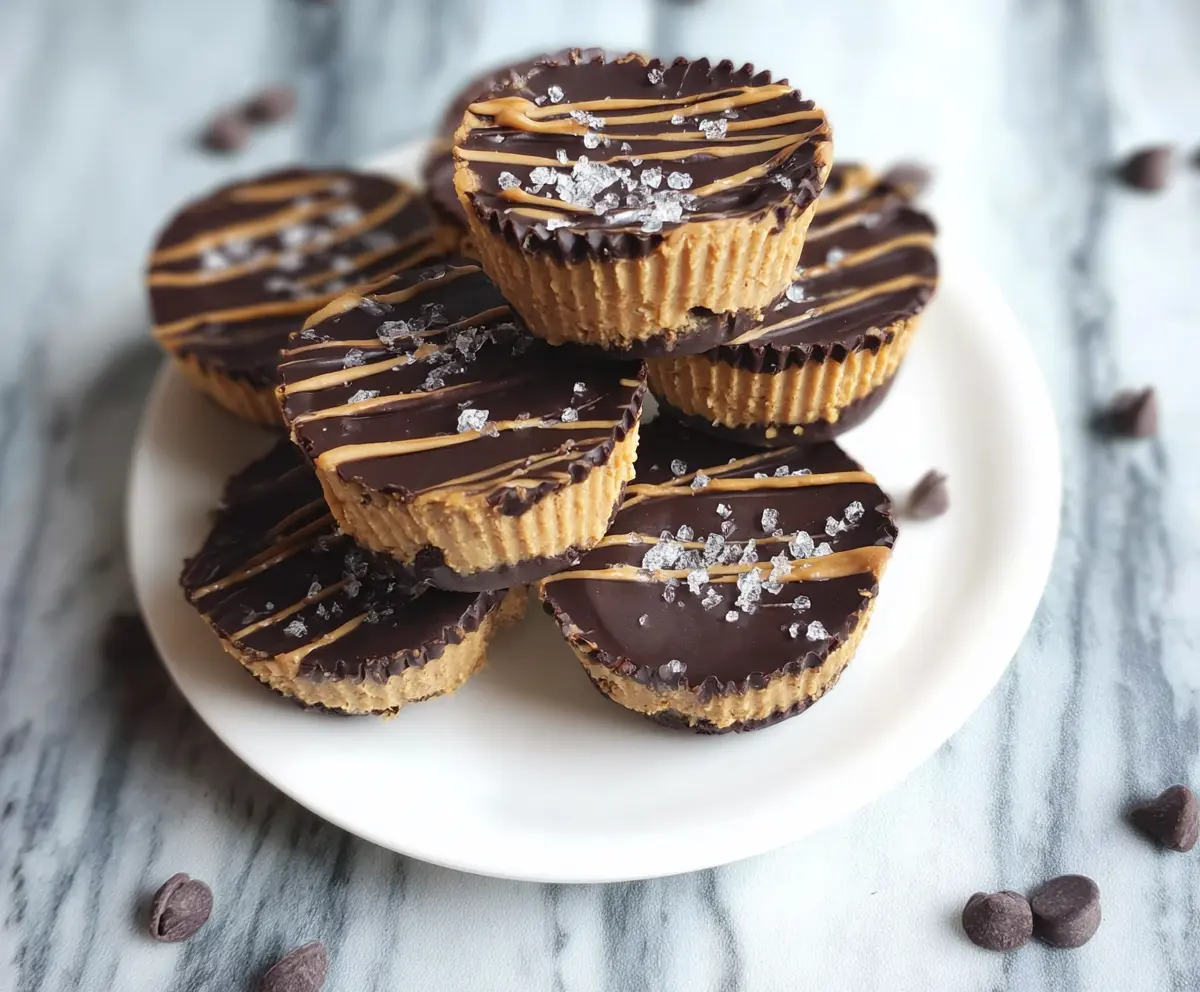
Healthy 3-Ingredient Peanut Butter Cups are the perfect little treat when you want something sweet yet simple. With just peanut butter, a bit of honey or maple syrup, and dark chocolate, these cups pack a creamy, nutty punch wrapped in a smooth chocolate shell. They’re super easy to make and feel like a special dessert without any fuss.
I love making these cups when I need a quick snack that satisfies my sweet tooth but doesn’t leave me feeling guilty. The combo of salty and sweet with rich peanut butter and chocolate is something I always go back to. Plus, with only three ingredients, it’s hard to mess them up – which is a total win for me in the kitchen.
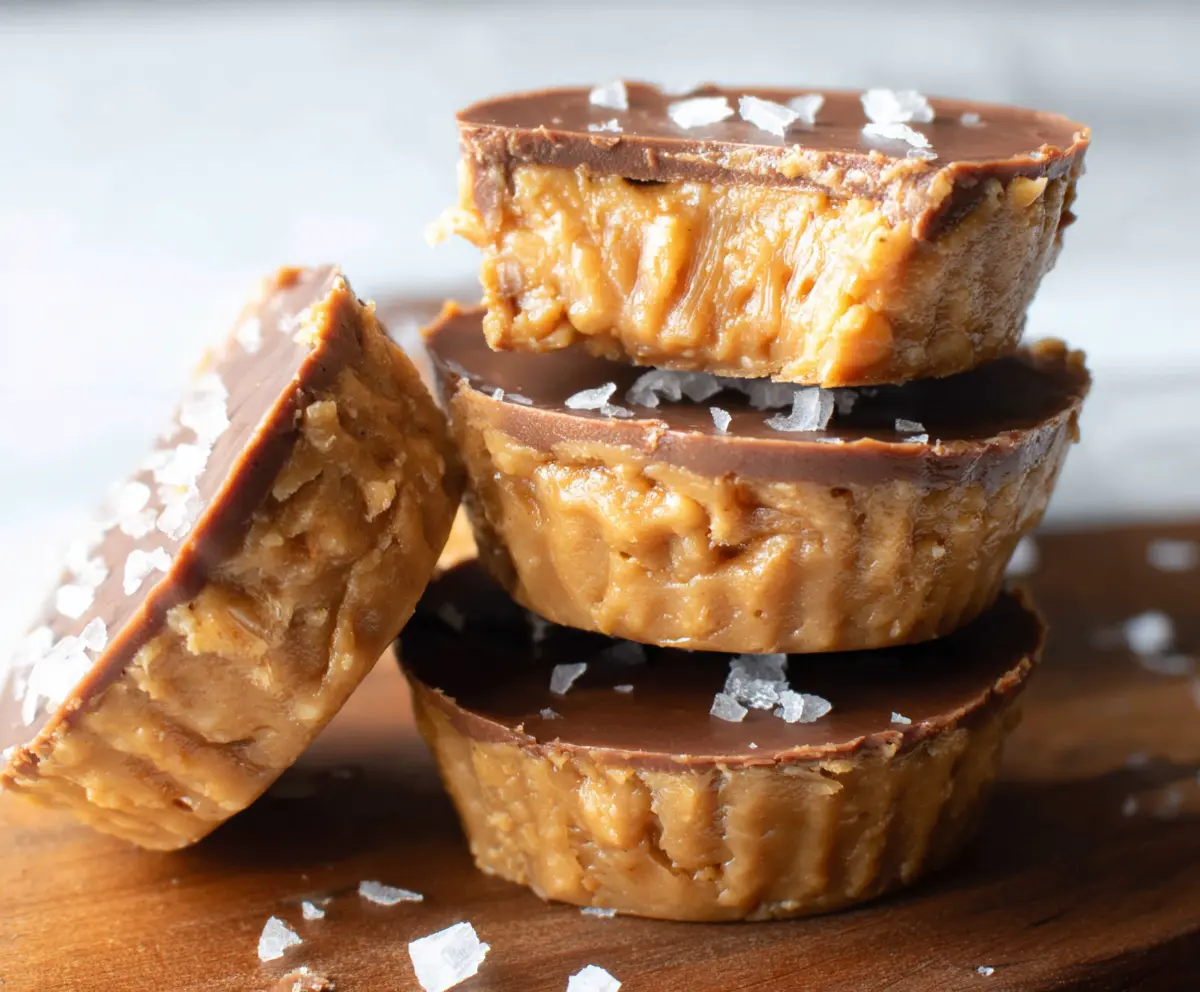
My favorite way to enjoy them is chilled straight from the fridge, especially on a warm day when you want that cool, chocolatey snap. I usually keep a batch ready in the freezer, so whenever a craving hits, I just grab one. Honestly, they’re so good that friends always ask for the recipe when I bring them along to gatherings.
Key Ingredients & Substitutions
Natural Peanut Butter: I prefer smooth and unsweetened peanut butter to keep these cups healthy and creamy. If you like a bit of crunch, crunchy natural peanut butter works too. For allergies, you can swap peanut butter with almond or sunflower seed butter.
Maple Syrup or Honey: This adds just a touch of natural sweetness. I like maple syrup better for its mild flavor, but honey works well too. If you want a vegan option, stick with maple syrup.
Dark Chocolate Chips: Using chocolate with at least 70% cocoa gives you just the right balance of rich flavor without too much sugar. You can use dairy-free or vegan dark chocolate chips to make these cups dairy-free.
Optional Sea Salt: A sprinkle of sea salt flakes on top brings out the peanut butter and chocolate flavors beautifully. I always add it—it adds that little extra punch.
How Do You Make Perfect Peanut Butter Cups Without Melting Troubles?
The key is gently melting the chocolate to keep it smooth and shiny. Here’s what I do:
- Use a microwave in short 20-30 second bursts, stirring between each to avoid burning.
- Or melt gently in a double boiler (a bowl over simmering water), stirring often.
- Spoon the chocolate carefully to form a thin, even layer on the bottom, then freeze it to set before adding the peanut butter layer. This helps keep layers distinct.
- After adding the peanut butter, cover fully with the remaining melted chocolate and freeze again until firm.
This slow, controlled melting and layering creates that classic peanut butter cup look and taste. Trust me, taking this extra care makes all the difference!
Equipment You’ll Need
- Mini muffin tin or small cupcake mold – I use this to shape the cups perfectly and keep everything neat.
- Paper liners – help keep the chocolate from sticking and make serving easy.
- Microwave-safe bowl or double boiler – I prefer the double boiler for gentle melting, but microwave works fine if you do short bursts and stir often.
- Rubber spatula or spoon – for mixing and spreading the chocolate and peanut butter layers.
- Freezer – necessary to set the chocolate and peanut butter layers quickly and keep everything firm.
Flavor Variations & Add-Ins
- Switch up the nut butter: almond or sunflower seed butter add new flavor twists and are good for nut allergies.
- Mix in some chopped nuts or shredded coconut into the peanut butter layer for extra texture.
- Top with a few mini chocolate chips or a drizzle of white chocolate for decorative touches.
- Add a dash of cinnamon or vanilla extract to the peanut butter for a subtle flavor boost.
Healthy 3-Ingredient Peanut Butter Cups
Ingredients You’ll Need:
- 1 cup natural peanut butter (smooth or crunchy, unsweetened and unsalted)
- 1/4 cup pure maple syrup or honey
- 1 cup dark chocolate chips (at least 70% cocoa)
- Optional: sea salt flakes for topping
How Much Time Will You Need?
This recipe takes about 10 minutes to prepare, plus around 30 minutes for chilling and setting in the freezer. The process is quick and easy, letting you enjoy homemade peanut butter cups without much wait!
Step-by-Step Instructions:
1. Prepare Your Cups:
Start by lining a mini muffin tin or cupcake mold with paper liners. This makes it super easy to remove your peanut butter cups when they’re ready.
2. Melt and Layer the Chocolate:
Take half of the dark chocolate chips and melt them gently in a microwave-safe bowl in short bursts or over a double boiler, stirring until smooth. Spoon a small amount of melted chocolate into the bottom of each paper liner, spreading it evenly to cover the base. Pop the tin into the freezer for about 10 minutes to let this layer firm up.
3. Mix and Add the Peanut Butter Filling:
While the chocolate sets, mix the peanut butter and maple syrup (or honey) together well until smooth and creamy. Once the chocolate bases are firm, spoon an even layer of the peanut butter mixture over each one, gently pressing down to spread it out.
4. Finish with Chocolate and Chill:
Melt the remaining dark chocolate chips and spoon or drizzle this on top of the peanut butter layer, fully covering it to seal the cups. If you like, sprinkle a pinch of sea salt flakes over the tops for a delicious salty-sweet touch. Place the tin back in the freezer for another 15-20 minutes until the peanut butter cups are solid.
5. Serve and Store:
Remove the peanut butter cups from the freezer and let them sit a few minutes at room temperature for easier handling. Enjoy your tasty, healthy treat! Store any leftovers in an airtight container in the fridge or freezer.
Can I Use Frozen Peanut Butter for This Recipe?
It’s best to use peanut butter at room temperature for easy mixing and smooth texture. If your peanut butter is frozen, thaw it overnight in the fridge or gently warm it in a microwave before mixing.
How Long Do These Peanut Butter Cups Keep?
You can store them in an airtight container in the fridge for up to 2 weeks or freeze for up to 3 months. Just thaw in the fridge before eating for the best texture.
Can I Substitute Maple Syrup with Another Sweetener?
Yes! Honey works very well as a natural sweetener. For a vegan option, stick with maple syrup. Avoid refined sugars to keep the recipe healthy.
What’s the Best Way to Melt Chocolate Without Burning It?
Use short microwave bursts of 20-30 seconds, stirring between each, or melt gently over a double boiler while stirring frequently to avoid scorching.